Lets Get Started
There are different scenarios in which you will be starting to work on a project.
Start a project from the scratch
Take part in an Open Source Project
Lets see how we start a project from the scratch
Start a project from the scratch
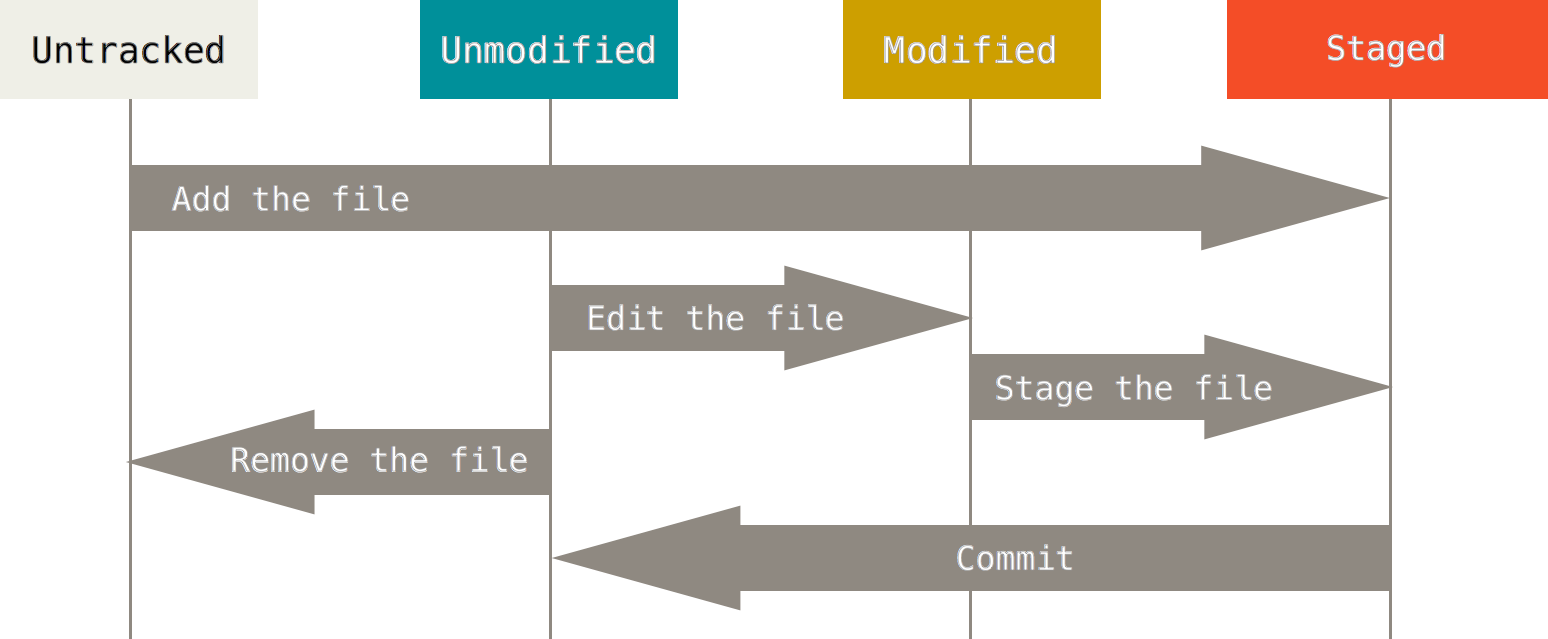
init , add, commit
The lifecycle of the status of your files.
init
To Kickstart with git all you need to do is go to your project folder
and
$ git init
Note: General advice for PHP Developer keep your /var/www/project-name as your project folder. Don't keep in a seperate folder and try to move around the files.
git init Creates an empty git repository or reinitialize an existing one.
An initial HEAD file that references the HEAD of the master branch is also created.
Running git init in an existing repository is safe. It will not overwrite things that are already there.
basically a .git directory with subdirectories for objects, refs/heads, refs/tags is created in the current folder.
add
Add file contents to the index
Syntax
git add [options] <filepattern>
You can add a file
git add filename
Adding *.c only
Adding a set of files that matches a pattern
git add *.c
Add all files
Add all the files in the current folder and recursively add all the subfolders too.
git add .
Add files by inspecting changes to add ( interactive patch selection )
git add -p
Best Practice: Its always good to review Changes before its commited.
Output will be something like this. This will vary from your computer output.
diff --git a/protected/config/main.php b/protected/config/main.php
index e8e7a42..4c88ef3 100755
--- a/protected/config/main.php
+++ b/protected/config/main.php
@@ -316,17 +316,17 @@ $db = substr($url["path"],1); */
                'errorAction'=>'site/error',
            ),

-           // 'log'=>array(
-           //  'class'=>'CLogRouter',
-           //  'routes'=>array(
-           //      array(
-           //          //'class'=>'CFileLogRoute',
-           //          'class'=>'CWebLogRoute',
-           //          //'levels'=>'trace, info, error, warning',
-           //          'enabled'=>YII_DEBUG,
-           //      ),
-           //  ),
-           // ),
+           'log'=>array(
+               'class'=>'CLogRouter',
+               'routes'=>array(
+                   array(
+                       //'class'=>'CFileLogRoute',
+                       'class'=>'CWebLogRoute',
+                       //'levels'=>'trace, info, error, warning',
+                       'enabled'=>YII_DEBUG,
+                   ),
+               ),
+           ),

        ),

Stage this hunk [y,n,q,a,d,/,e,?]?
You should observe Stage this hunk [y,n,q,a,d,/,e,?]?
Here is the interpretation of these
- y - stage this hunk
- n - do not stage this hunk
- q - quit; do not stage this hunk nor any of the remaining ones
- a - stage this hunk and all later hunks in the file
- d - do not stage this hunk nor any of the later hunks in the file
- g - select a hunk to go to
- / - search for a hunk matching the given regex
- j - leave this hunk undecided, see next undecided hunk
- J - leave this hunk undecided, see next hunk
- k - leave this hunk undecided, see previous undecided hunk
- K - leave this hunk undecided, see previous hunk
- s - split the current hunk into smaller hunks
- e - manually edit the current hunk
Very Useful stuff
Now you can actually understand why you have Staging Area
Also you can see your staged changes using git diff --cached or git diff --staged.
Now you can discard unwanted changes using git reset -p
It opens up in a nice interactive mode, Which Is one of the best practise.
Adding interactively
git add --interactive
To Understand
- git added index.md to the snapshot for the next commit.
- A snapshot represents the state of your project at a given point in time.
- git doesnt treats content changes to a file rather to file changes to a project.
- Git’s term for creating a snapshot is called staging.
Two Step Process
- Staging: Telling Git what files to include in the next commit.
- Committing: Recording the staged snapshot with a descriptive message.
Why Two Step Process
Staging Helps
- staging helps you split up one large change into multiple commits
- staging helps in reviewing changes
- staging helps when a merge has conflicts
- staging helps you keep extra local files hanging around
- staging helps you sneak in small changes ;-)
commit
git commit
Record changes to the repository
git commit
git commit -m "<message>"

## Shortcut to tell git to stage all the changes for files that are already added, and commit.

## Note:
New files should be separately added.

# It does not add any new files.
git commit -a
git commit --all
Changing the commit log message --amend option
$ git commit --amend -m 'message'
Adds new commit message with the previous staged content.
commitID
commit 3157ee3718e180a9476bf2e5cab8e3f1e78a73b7
Author: John Smith
Take part in an Open Source Project
clone
Clone a repository into a new directory.
When you clone a repo, You get a exact copy of the project along with its connection to remote repo / source from where it is cloned.
$ git clone <repo>
$ git clone <repo> [folder-where-to-clone]
Git Supported Protocols
Git supports a wide variety of protocol like ssh, http, https, ftp, ftps, rsync.
Git URLs
Following are url format for different protocols.
- ssh://[user@]host.xz[:port]/path/to/repo.git/
- git://host.xz[:port]/path/to/repo.git/
- http[s]://host.xz[:port]/path/to/repo.git/
- ftp[s]://host.xz[:port]/path/to/repo.git/
- rsync://host.xz/path/to/repo.git/
An alternative scp-like syntax may also be used with the ssh protocol:
[user@]host.xz:path/to/repo.git/
The ssh and git protocols additionally support ~username expansion:
ssh://[user@]host.xz[:port]/~[user]/path/to/repo.git/
git://host.xz[:port]/~[user]/path/to/repo.git/
[user@]host.xz:/~[user]/path/to/repo.git/
For local repositories, also supported by git natively, the following syntaxes may be used:
/path/to/repo.git/
file:///path/to/repo.git/
Note:
Sometimes You need to use sudo with all the commands if you are on linux for example
sudo git init